5.2 Nectar Research Cloud
Login to Nectar Research Cloud
-
Access Nectar Research Cloud via this link: https://dashboard.rc.nectar.org.au/
-
Click
Login VIA AAF (Australia)to log in using your institution’s credentials.
-
You will be redirected to the Nectar dashboard, where you can select your project from the top-left section.
Launch Testbed Instance in Nectar Research Cloud
-
In the left navigation bar, click
Project > Compute > Instancesto view all instances in your project. -
Click the
Launch Instancebutton at the top of the page.
-
On the Details tab, enter the instance name and description.

-
On the Source tab, search for
CentOSand selectNeCTAR CentOS Stream 9 x86_64using the up arrow on the right.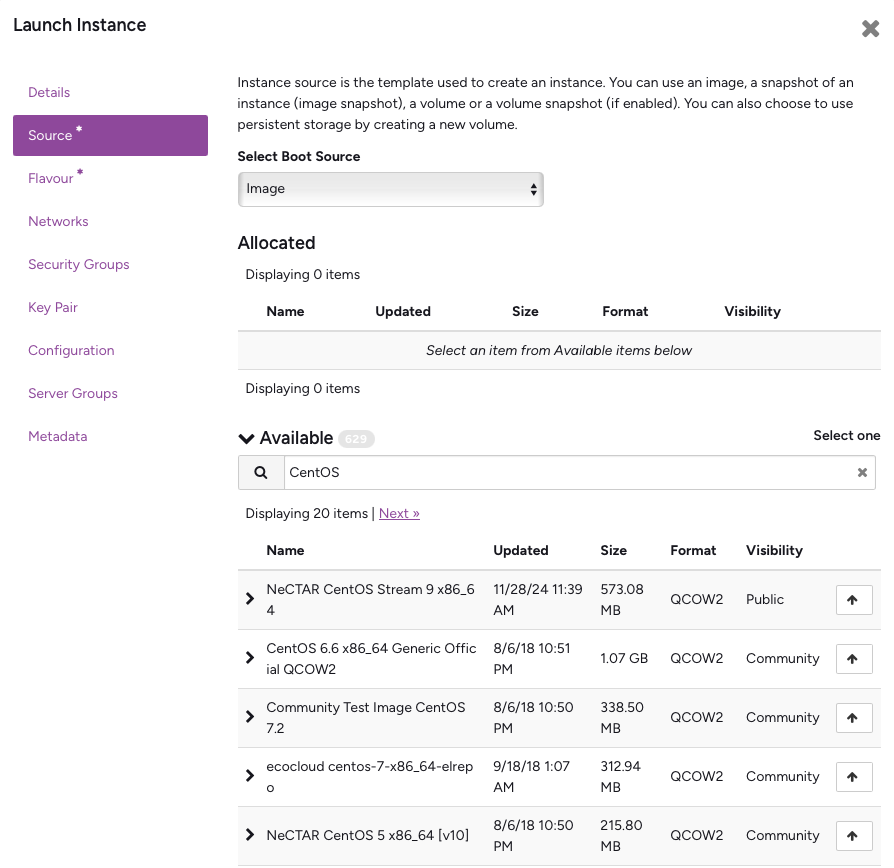
-
On the Flavour tab, search for
m3(memory-optimised instances) and select a flavour ofm3.mediumor larger to reduce build time.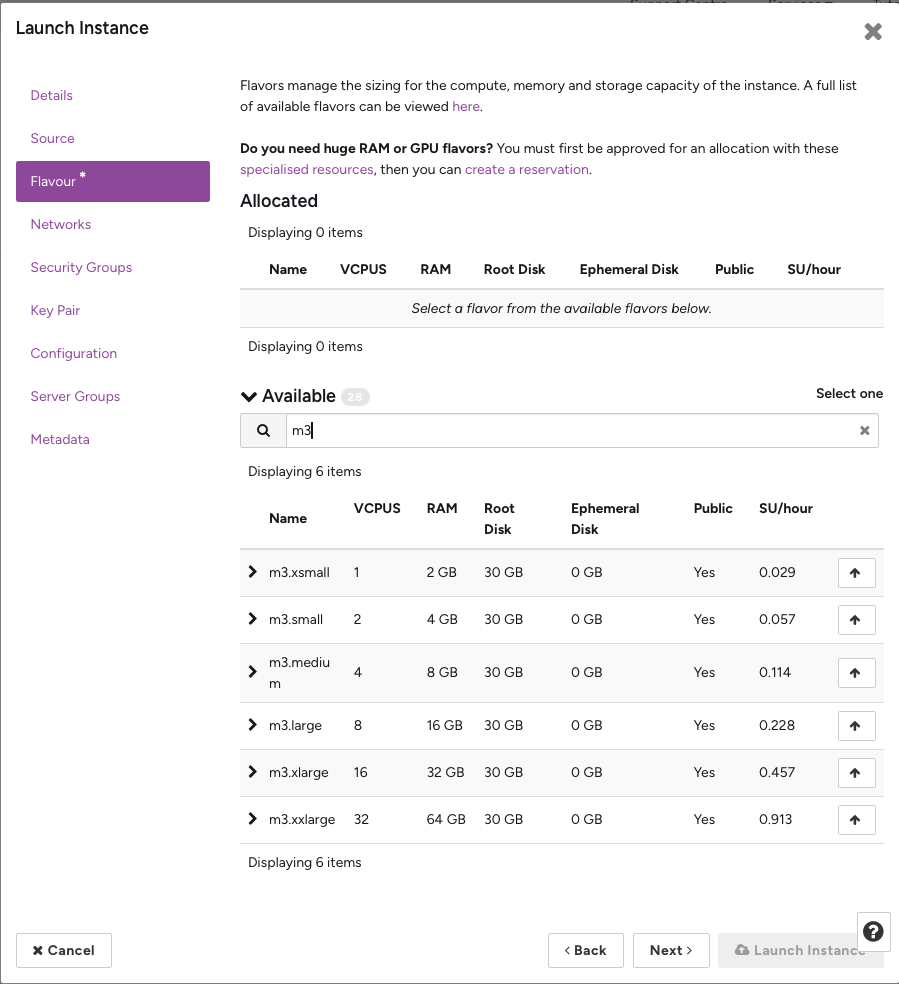
-
On the Key Pair tab, if you don’t have a key pair, create one by clicking the
Create Key Pairbutton. This is required for SSH access to your instance.Note
When creating a key pair, you will be prompted to copy the private key. Save this to a
.pemfile for future use. If you fail to save it, you can still connect using alternative methods.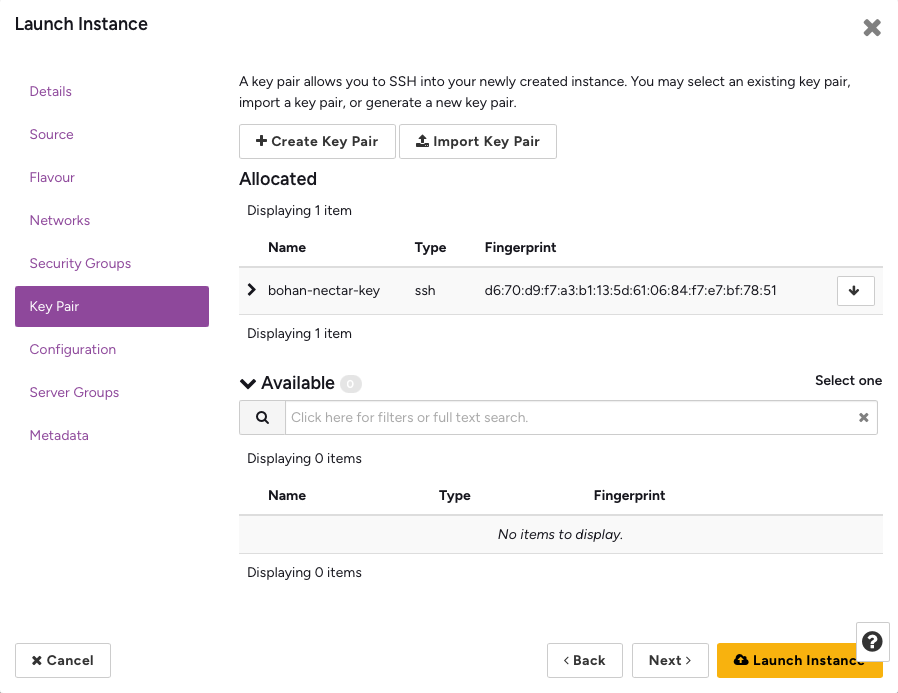
-
On the Configuration tab, paste the following shell script. This will automatically install all required packages, clone the testbed repository, and build the testbed environment.
Click here to see the full configuration script
#!/bin/bash

export TZ="Australia/Melbourne"

echo "================================================"
echo
echo " Image building started at: $(date '+%Y-%m-%d %H:%M:%S')"
echo
echo "================================================"

CLOUDFRONT_URL="https://d3rilomah9t6qy.cloudfront.net"
TEMP_DIR="/tmp/RACE"
POSTMAN_CLI_INSTALLER_KEY="install-postman-cli.sh"
MOTD_SH_KEY="mymotd-ads.sh"
DASHBOARD_OPERATOR_PY_KEY="dashboard-operator.py"
DASHBOARD_OPERATOR_REQ_KEY="requirements.txt"
IDS_TESTBED_REPO="https://github.com/RACE-RMIT-Advanced-Cloud-Ecosystem/ADS-Testbed"
VNC_USER="ec2-user"
USER_HOME="/home/ec2-user"
MIMEAPPS_LIST="$USER_HOME/.config/mimeapps.list"
TESTBED_DIR="$USER_HOME/IDS-testbed"
NODE_VERSION=22

# configure motd
sudo curl -o /etc/profile.d/mymotd.sh $CLOUDFRONT_URL/$MOTD_SH_KEY

# update repos and install epel
sudo dnf update && sudo dnf upgrade -y
sudo dnf install -y epel-release || sudo dnf config-manager --set-enabled crb && sudo dnf install -y epel-release
# install packages use dnf
sudo dnf install -y snapd gnome-shell-extension-dash-to-dock yum-utils git firewalld nano wget tigervnc-server golang sqlite-devel gcc java-11-openjdk-headless
dnf groupinstall -y "Server with GUI"
sudo systemctl enable snapd
sudo systemctl start snapd
# make temporary dir
mkdir -p $TEMP_DIR $USER_HOME/.config/code-server/certs

# install code-server and configure
export HOME=$USER_HOME && curl -fsSL https://code-server.dev/install.sh | sh
openssl req -x509 -nodes -days 365 -newkey rsa:2048 -keyout $USER_HOME/.config/code-server/certs/key.pem -out $USER_HOME/.config/code-server/certs/cert.pem -subj "/CN=RACE"
## code-server configuration file
cat <<EOF > $USER_HOME/.config/code-server/config.yaml
bind-addr: 0.0.0.0:8000
auth: none
cert: $USER_HOME/.config/code-server/certs/cert.pem
cert-key: $USER_HOME/.config/code-server/certs/key.pem
EOF
## code-server service file
sudo tee /etc/systemd/system/code-server.service << EOF
[Unit]
Description=code-server
After=network.target

[Service]
Type=simple
User=ec2-user
ExecStart=/usr/bin/code-server --config $USER_HOME/.config/code-server/config.yaml $USER_HOME/IDS-testbed
Restart=always

[Install]
WantedBy=multi-user.target
EOF
sudo systemctl daemon-reload
sudo systemctl enable code-server
# code-server desktop entry
sudo wget -O /usr/share/pixmaps/code-server.png https://code.visualstudio.com/assets/images/code-stable.png
sudo tee /usr/share/applications/code-server.desktop << EOF
[Desktop Entry]
Name=Code Server
Comment=Open Code Server in Browser
Exec=chromium http://localhost:8000
Icon=/usr/share/pixmaps/code-server.png
Terminal=false
Type=Application
Categories=TextEditor;Development;IDE;
EOF

# configure gnome
sudo wget -O /usr/share/backgrounds/wp.jpg $CLOUDFRONT_URL/ADS.jpg
sudo tee /usr/share/glib-2.0/schemas/15_race_dcv_settings.gschema.override << EOF
[org.gnome.desktop.background]
picture-uri = 'file:///usr/share/backgrounds/wp.jpg'
picture-options = 'stretched'

[org.gnome.desktop.screensaver]
lock-enabled = false

[org.gnome.desktop.lockdown]
disable-lock-screen = true
disable-log-out = true
disable-user-switching = true
user-administration-disabled = true
disable-print-setup = true
disable-printing = true

[org.gnome.desktop.interface]
clock-format = '12h'

[org.gnome.shell]
favorite-apps = ['chromium_chromium.desktop', 'org.gnome.Nautilus.desktop', 'org.gnome.Terminal.desktop', 'code-server.desktop', 'postman_postman.desktop']
enabled-extensions = ['dash-to-dock@gnome-shell-extensions.gcampax.github.com']

[org.gnome.shell.extensions.dash-to-dock]
dock-fixed = true
dock-position = 'BOTTOM'
show-favorites = true
show-running = true
show-apps-at-top = true

[org.gnome.desktop.wm.preferences]
button-layout = 'appmenu:minimize,maximize,close'

[org.gnome.login-screen]
disable-restart-buttons = true
EOF
sudo glib-compile-schemas /usr/share/glib-2.0/schemas/

## Disable the RedHat welcome tour ##
touch $USER_HOME/.config/gnome-welcome-tour-done
touch $USER_HOME/.config/gnome-initial-setup-done-setup had-initial-user true
touch $USER_HOME/.config/gnome-initial-setup-done
echo 'yes' > $USER_HOME/.config/gnome-initial-setup-done

# configure TigerVNC
sudo cp /usr/lib/systemd/system/vncserver@.service /etc/systemd/system/vncserver@:1.service
sudo systemctl daemon-reload
sudo systemctl enable vncserver@:1.service
sudo systemctl start vncserver@:1.service
mkdir -p /home/$VNC_USER/.vnc
sudo chown -R ec2-user:ec2-user /home/$VNC_USER/.vnc
tee /etc/tigervnc/vncserver.users <<EOF
:1=$VNC_USER
EOF
tee /home/$VNC_USER/.vnc/config <<EOF
session=gnome
geometry=1920x1080
localhost=no
SecurityTypes=None
EOF

# install novnc
sudo dnf -y install novnc python3-websockify python3-numpy
mkdir -p $USER_HOME/.novnc/certs
sudo chown -R ec2-user:ec2-user /home/$VNC_USER/.novnc
openssl req -x509 -nodes -newkey rsa:3072 -keyout $USER_HOME/.novnc/certs/novnc.key -out $USER_HOME/.novnc/certs/novnc.crt -days 3650 -subj "/CN=RACE"
cat $USER_HOME/.novnc/certs/novnc.key $USER_HOME/.novnc/certs/novnc.crt > $USER_HOME/.novnc/certs/novnc.pem
## create novnc service file
sudo tee /etc/systemd/system/novnc.service << EOF
[Unit]
Description=noVNC Service
After=network.target vncserver@:1.service
Requires=vncserver@:1.service

[Service]
Type=simple
User=ec2-user
ExecStart=/usr/bin/novnc_proxy --listen 8443 --cert $USER_HOME/.novnc/certs/novnc.pem --vnc localhost:5901 --ssl-only
Restart=always

[Install]
WantedBy=multi-user.target
EOF
sudo systemctl daemon-reload
sudo systemctl enable novnc.service
sudo systemctl start novnc.service

# configure novnc resize setting
sed -i "s/UI.initSetting('resize', 'off');/UI.initSetting('resize', 'remote');/g" /usr/share/novnc/app/ui.js

# open firewall ports
sudo systemctl enable firewalld
sudo systemctl start firewalld
sudo firewall-cmd --permanent --add-port=80/tcp
sudo firewall-cmd --permanent --add-port=443/tcp
sudo firewall-cmd --permanent --add-port=8080/tcp
sudo firewall-cmd --permanent --add-port=8081/tcp
sudo firewall-cmd --permanent --add-port=81/tcp
sudo firewall-cmd --permanent --add-port=444/tcp
sudo firewall-cmd --permanent --add-port=5901/tcp
sudo firewall-cmd --permanent --add-port=8000/tcp
sudo firewall-cmd --permanent --add-port=8443/tcp
sudo firewall-cmd --reload

# install docker
sudo yum-config-manager --add-repo https://download.docker.com/linux/rhel/docker-ce.repo
sudo dnf install -y docker-ce docker-ce-cli containerd.io docker-buildx-plugin docker-compose-plugin
sudo systemctl start docker
sudo systemctl enable docker

# install postman cli
wget -O $TEMP_DIR/$POSTMAN_CLI_INSTALLER_KEY $CLOUDFRONT_URL/$POSTMAN_CLI_INSTALLER_KEY
sh $TEMP_DIR/$POSTMAN_CLI_INSTALLER_KEY

# clean up temp folder
rm -rf $TEMP_DIR

# install packages use snap
sudo snap install chromium postman

# install cfssl
sudo su << CFSSL_EOF
export HOME=/root
export GOPATH=/go
export GOMODCACHE=/go/pkg/mod
mkdir -p $GOPATH/bin $GOMODCACHE
mkdir -p /tmp/cfssl-install && cd /tmp/cfssl-install
go mod init cfssl-install
go install github.com/cloudflare/cfssl/cmd/cfssl@latest
go install github.com/cloudflare/cfssl/cmd/cfssljson@latest
go get github.com/mattn/go-sqlite3
mv /go/bin/cfssl /usr/local/bin/
mv /go/bin/cfssljson /usr/local/bin/
CFSSL_EOF

# clone the main repo
git clone "$IDS_TESTBED_REPO" "$TESTBED_DIR"

# Install Node Version Manager
curl -o- https://raw.githubusercontent.com/nvm-sh/nvm/v0.40.3/install.sh | bash
\. "$HOME/.nvm/nvm.sh"
nvm install $NODE_VERSION
[ -n "$(which npm)" ] && echo "export PATH=\"\$PATH:$(dirname "$(which npm)")\"" >> $USER_HOME/.bashrc
## Install newman and newman-reporter-html
npm install -g newman newman-reporter-html

## Make Chromium the default browser ##
mkdir -p $(dirname "$MIMEAPPS_LIST")
cat > "$MIMEAPPS_LIST" << EOL
[Default Applications]
text/html=chromium_chromium.desktop
x-scheme-handler/http=chromium_chromium.desktop
x-scheme-handler/https=chromium_chromium.desktop
x-scheme-handler/about=chromium_chromium.desktop
x-scheme-handler/unknown=chromium_chromium.desktop
application/xhtml+xml=chromium_chromium.desktop
EOL

## Correct user folder permissions ##
sudo chown -R ec2-user:ec2-user $TESTBED_DIR $USER_HOME/.cache/ $USER_HOME/.config/ /usr/bin/code-server

# add python script to support dashboard operations
sudo su << DASHBOARD_OPERATOR_EOF
mkdir -p /opt/dashboard-operator

curl -o /opt/dashboard-operator/$DASHBOARD_OPERATOR_PY_KEY $CLOUDFRONT_URL/$DASHBOARD_OPERATOR_PY_KEY
curl -o /opt/dashboard-operator/$DASHBOARD_OPERATOR_REQ_KEY $CLOUDFRONT_URL/$DASHBOARD_OPERATOR_REQ_KEY

python3 -m venv /opt/dashboard-operator/venv
source /opt/dashboard-operator/venv/bin/activate
pip install -r /opt/dashboard-operator/$DASHBOARD_OPERATOR_REQ_KEY

cat > /etc/systemd/system/dashboard-operator.service << EOF
[Unit]
Description=Dashboard Operator Service
After=network.target

[Service]
Type=simple
User=root
WorkingDirectory=/home/ec2-user/IDS-testbed
Environment=PATH=/usr/local/sbin:/usr/local/bin:/usr/sbin:/usr/bin:/var/lib/snapd/snap/bin
ExecStart=/opt/dashboard-operator/venv/bin/python /opt/dashboard-operator/$DASHBOARD_OPERATOR_PY_KEY
Restart=always
RestartSec=10

[Install]
WantedBy=multi-user.target
EOF

systemctl daemon-reload
systemctl enable dashboard-operator.service
systemctl start dashboard-operator.service
DASHBOARD_OPERATOR_EOF

echo "===================================================="
echo
echo " Starting Docker compose up at: $(date '+%Y-%m-%d %H:%M:%S')"
echo
echo "===================================================="

# manually compose up docker
export COMPOSE_PARALLEL_LIMIT=1
cd $TESTBED_DIR && sudo docker compose up -d

echo "================================================="
echo
echo " Image building finished at: $(date '+%Y-%m-%d %H:%M:%S')"
echo
echo "================================================="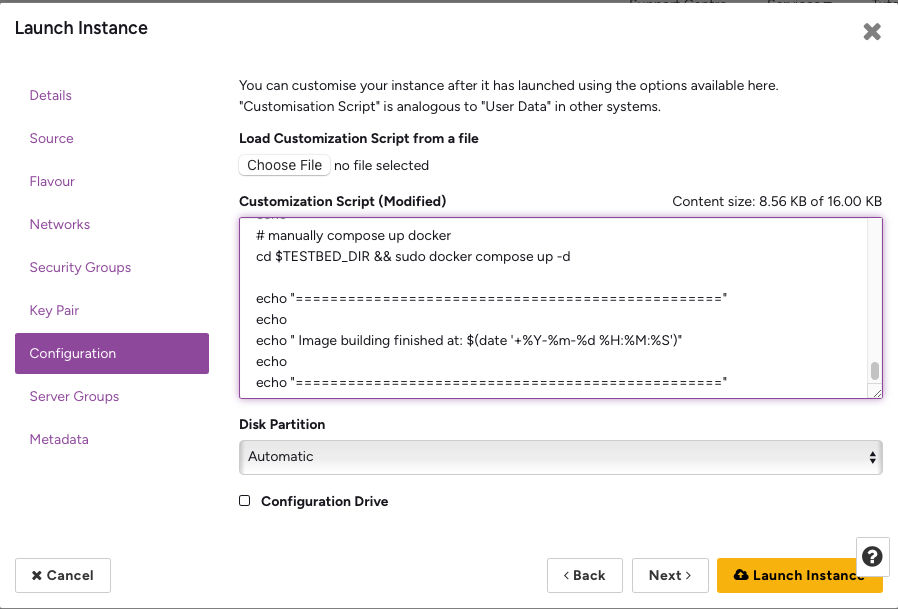
-
If you want to set up a single connector, use the following script instead:
Click here to see the full configuration script for single connector
#!/bin/bash

export TZ="Australia/Melbourne"

echo "================================================"
echo
echo " Image building started at: $(date '+%Y-%m-%d %H:%M:%S')"
echo
echo "================================================"

CLOUDFRONT_URL="https://d3rilomah9t6qy.cloudfront.net"
TEMP_DIR="/tmp/RACE"
POSTMAN_CLI_INSTALLER_KEY="install-postman-cli.sh"
MOTD_SH_KEY="mymotd-ads.sh"
DASHBOARD_OPERATOR_PY_KEY="dashboard-operator.py"
DASHBOARD_OPERATOR_REQ_KEY="requirements.txt"
IDS_TESTBED_REPO="https://github.com/RACE-RMIT-Advanced-Cloud-Ecosystem/ADS-Connector"
VNC_USER="ec2-user"
USER_HOME="/home/ec2-user"
MIMEAPPS_LIST="$USER_HOME/.config/mimeapps.list"
TESTBED_DIR="$USER_HOME/IDS-testbed"
NODE_VERSION=22

# configure motd
sudo curl -o /etc/profile.d/mymotd.sh $CLOUDFRONT_URL/$MOTD_SH_KEY

# update repos and install epel
sudo dnf update && sudo dnf upgrade -y
sudo dnf install -y epel-release || sudo dnf config-manager --set-enabled crb && sudo dnf install -y epel-release
# install packages use dnf
sudo dnf install -y snapd gnome-shell-extension-dash-to-dock yum-utils git firewalld nano wget tigervnc-server golang sqlite-devel gcc java-11-openjdk-headless
dnf groupinstall -y "Server with GUI"
sudo systemctl enable snapd
sudo systemctl start snapd
# make temporary dir
mkdir -p $TEMP_DIR $USER_HOME/.config/code-server/certs

# install code-server and configure
export HOME=$USER_HOME && curl -fsSL https://code-server.dev/install.sh | sh
openssl req -x509 -nodes -days 365 -newkey rsa:2048 -keyout $USER_HOME/.config/code-server/certs/key.pem -out $USER_HOME/.config/code-server/certs/cert.pem -subj "/CN=RACE"
## code-server configuration file
cat <<EOF > $USER_HOME/.config/code-server/config.yaml
bind-addr: 0.0.0.0:8000
auth: none
cert: $USER_HOME/.config/code-server/certs/cert.pem
cert-key: $USER_HOME/.config/code-server/certs/key.pem
EOF
## code-server service file
sudo tee /etc/systemd/system/code-server.service << EOF
[Unit]
Description=code-server
After=network.target

[Service]
Type=simple
User=ec2-user
ExecStart=/usr/bin/code-server --config $USER_HOME/.config/code-server/config.yaml $USER_HOME/IDS-testbed
Restart=always

[Install]
WantedBy=multi-user.target
EOF
sudo systemctl daemon-reload
sudo systemctl enable code-server
# code-server desktop entry
sudo wget -O /usr/share/pixmaps/code-server.png https://code.visualstudio.com/assets/images/code-stable.png
sudo tee /usr/share/applications/code-server.desktop << EOF
[Desktop Entry]
Name=Code Server
Comment=Open Code Server in Browser
Exec=chromium http://localhost:8000
Icon=/usr/share/pixmaps/code-server.png
Terminal=false
Type=Application
Categories=TextEditor;Development;IDE;
EOF

# configure gnome
sudo wget -O /usr/share/backgrounds/wp.jpg $CLOUDFRONT_URL/ADS.jpg
sudo tee /usr/share/glib-2.0/schemas/15_race_dcv_settings.gschema.override << EOF
[org.gnome.desktop.background]
picture-uri = 'file:///usr/share/backgrounds/wp.jpg'
picture-options = 'stretched'

[org.gnome.desktop.screensaver]
lock-enabled = false

[org.gnome.desktop.lockdown]
disable-lock-screen = true
disable-log-out = true
disable-user-switching = true
user-administration-disabled = true
disable-print-setup = true
disable-printing = true

[org.gnome.desktop.interface]
clock-format = '12h'

[org.gnome.shell]
favorite-apps = ['chromium_chromium.desktop', 'org.gnome.Nautilus.desktop', 'org.gnome.Terminal.desktop', 'code-server.desktop', 'postman_postman.desktop']
enabled-extensions = ['dash-to-dock@gnome-shell-extensions.gcampax.github.com']

[org.gnome.shell.extensions.dash-to-dock]
dock-fixed = true
dock-position = 'BOTTOM'
show-favorites = true
show-running = true
show-apps-at-top = true

[org.gnome.desktop.wm.preferences]
button-layout = 'appmenu:minimize,maximize,close'

[org.gnome.login-screen]
disable-restart-buttons = true
EOF
sudo glib-compile-schemas /usr/share/glib-2.0/schemas/

## Disable the RedHat welcome tour ##
touch $USER_HOME/.config/gnome-welcome-tour-done
touch $USER_HOME/.config/gnome-initial-setup-done-setup had-initial-user true
touch $USER_HOME/.config/gnome-initial-setup-done
echo 'yes' > $USER_HOME/.config/gnome-initial-setup-done

# configure TigerVNC
sudo cp /usr/lib/systemd/system/vncserver@.service /etc/systemd/system/vncserver@:1.service
sudo systemctl daemon-reload
sudo systemctl enable vncserver@:1.service
sudo systemctl start vncserver@:1.service
mkdir -p /home/$VNC_USER/.vnc
sudo chown -R ec2-user:ec2-user /home/$VNC_USER/.vnc
tee /etc/tigervnc/vncserver.users <<EOF
:1=$VNC_USER
EOF
tee /home/$VNC_USER/.vnc/config <<EOF
session=gnome
geometry=1920x1080
localhost=no
SecurityTypes=None
EOF

# install novnc
sudo dnf -y install novnc python3-websockify python3-numpy
mkdir -p $USER_HOME/.novnc/certs
sudo chown -R ec2-user:ec2-user /home/$VNC_USER/.novnc
openssl req -x509 -nodes -newkey rsa:3072 -keyout $USER_HOME/.novnc/certs/novnc.key -out $USER_HOME/.novnc/certs/novnc.crt -days 3650 -subj "/CN=RACE"
cat $USER_HOME/.novnc/certs/novnc.key $USER_HOME/.novnc/certs/novnc.crt > $USER_HOME/.novnc/certs/novnc.pem
## create novnc service file
sudo tee /etc/systemd/system/novnc.service << EOF
[Unit]
Description=noVNC Service
After=network.target vncserver@:1.service
Requires=vncserver@:1.service

[Service]
Type=simple
User=ec2-user
ExecStart=/usr/bin/novnc_proxy --listen 8443 --cert $USER_HOME/.novnc/certs/novnc.pem --vnc localhost:5901 --ssl-only
Restart=always

[Install]
WantedBy=multi-user.target
EOF
sudo systemctl daemon-reload
sudo systemctl enable novnc.service
sudo systemctl start novnc.service

# configure novnc resize setting
sed -i "s/UI.initSetting('resize', 'off');/UI.initSetting('resize', 'remote');/g" /usr/share/novnc/app/ui.js

# open firewall ports
sudo systemctl enable firewalld
sudo systemctl start firewalld
sudo firewall-cmd --permanent --add-port=80/tcp
sudo firewall-cmd --permanent --add-port=443/tcp
sudo firewall-cmd --permanent --add-port=8080/tcp
sudo firewall-cmd --permanent --add-port=8081/tcp
sudo firewall-cmd --permanent --add-port=81/tcp
sudo firewall-cmd --permanent --add-port=444/tcp
sudo firewall-cmd --permanent --add-port=5901/tcp
sudo firewall-cmd --permanent --add-port=8000/tcp
sudo firewall-cmd --permanent --add-port=8443/tcp
sudo firewall-cmd --reload

# install docker
sudo yum-config-manager --add-repo https://download.docker.com/linux/rhel/docker-ce.repo
sudo dnf install -y docker-ce docker-ce-cli containerd.io docker-buildx-plugin docker-compose-plugin
sudo systemctl start docker
sudo systemctl enable docker

# install postman cli
wget -O $TEMP_DIR/$POSTMAN_CLI_INSTALLER_KEY $CLOUDFRONT_URL/$POSTMAN_CLI_INSTALLER_KEY
sh $TEMP_DIR/$POSTMAN_CLI_INSTALLER_KEY

# clean up temp folder
rm -rf $TEMP_DIR

# install packages use snap
sudo snap install chromium postman

# install cfssl
sudo su << CFSSL_EOF
export HOME=/root
export GOPATH=/go
export GOMODCACHE=/go/pkg/mod
mkdir -p $GOPATH/bin $GOMODCACHE
mkdir -p /tmp/cfssl-install && cd /tmp/cfssl-install
go mod init cfssl-install
go install github.com/cloudflare/cfssl/cmd/cfssl@latest
go install github.com/cloudflare/cfssl/cmd/cfssljson@latest
go get github.com/mattn/go-sqlite3
mv /go/bin/cfssl /usr/local/bin/
mv /go/bin/cfssljson /usr/local/bin/
CFSSL_EOF

# clone the main repo
git clone "$IDS_TESTBED_REPO" "$TESTBED_DIR"

# Install Node Version Manager
curl -o- https://raw.githubusercontent.com/nvm-sh/nvm/v0.40.3/install.sh | bash
\. "$HOME/.nvm/nvm.sh"
nvm install $NODE_VERSION
[ -n "$(which npm)" ] && echo "export PATH=\"\$PATH:$(dirname "$(which npm)")\"" >> $USER_HOME/.bashrc
## Install newman and newman-reporter-html
npm install -g newman newman-reporter-html

## Make Chromium the default browser ##
mkdir -p $(dirname "$MIMEAPPS_LIST")
cat > "$MIMEAPPS_LIST" << EOL
[Default Applications]
text/html=chromium_chromium.desktop
x-scheme-handler/http=chromium_chromium.desktop
x-scheme-handler/https=chromium_chromium.desktop
x-scheme-handler/about=chromium_chromium.desktop
x-scheme-handler/unknown=chromium_chromium.desktop
application/xhtml+xml=chromium_chromium.desktop
EOL

## Correct user folder permissions ##
sudo chown -R ec2-user:ec2-user $TESTBED_DIR $USER_HOME/.cache/ $USER_HOME/.config/ /usr/bin/code-server

# add python script to support dashboard operations
sudo su << DASHBOARD_OPERATOR_EOF
mkdir -p /opt/dashboard-operator

curl -o /opt/dashboard-operator/$DASHBOARD_OPERATOR_PY_KEY $CLOUDFRONT_URL/$DASHBOARD_OPERATOR_PY_KEY
curl -o /opt/dashboard-operator/$DASHBOARD_OPERATOR_REQ_KEY $CLOUDFRONT_URL/$DASHBOARD_OPERATOR_REQ_KEY

python3 -m venv /opt/dashboard-operator/venv
source /opt/dashboard-operator/venv/bin/activate
pip install -r /opt/dashboard-operator/$DASHBOARD_OPERATOR_REQ_KEY

cat > /etc/systemd/system/dashboard-operator.service << EOF
[Unit]
Description=Dashboard Operator Service
After=network.target

[Service]
Type=simple
User=root
WorkingDirectory=/home/ec2-user/IDS-testbed
Environment=PATH=/usr/local/sbin:/usr/local/bin:/usr/sbin:/usr/bin:/var/lib/snapd/snap/bin
ExecStart=/opt/dashboard-operator/venv/bin/python /opt/dashboard-operator/$DASHBOARD_OPERATOR_PY_KEY
Restart=always
RestartSec=10

[Install]
WantedBy=multi-user.target
EOF

systemctl daemon-reload
systemctl enable dashboard-operator.service
systemctl start dashboard-operator.service
DASHBOARD_OPERATOR_EOF

echo "===================================================="
echo
echo " Starting Docker compose up at: $(date '+%Y-%m-%d %H:%M:%S')"
echo
echo "===================================================="

# manually compose up docker
cd $TESTBED_DIR && sudo docker compose up -d

echo "================================================="
echo
echo " Image building finished at: $(date '+%Y-%m-%d %H:%M:%S')"
echo
echo "================================================="
-
-
After configuring your instance, click
Launch Instance. The instance will launch automatically and execute the configuration script. This process takes approximately 40 minutes depending on the selected flavour. Once complete, you can connect using several methods.
Configure Security Groups
Before connecting, configure the instance’s Security Group:
-
Navigate to
Project > Network > Security Groupsusing the left navigation bar. -
In the top-right corner, click
Create Security Group. -
Enter a meaningful name and description, then click
Create Security Group. You will be directed to the security group configuration page. -
Click the
Add Rulebutton in the top-right corner to open the rule configuration form: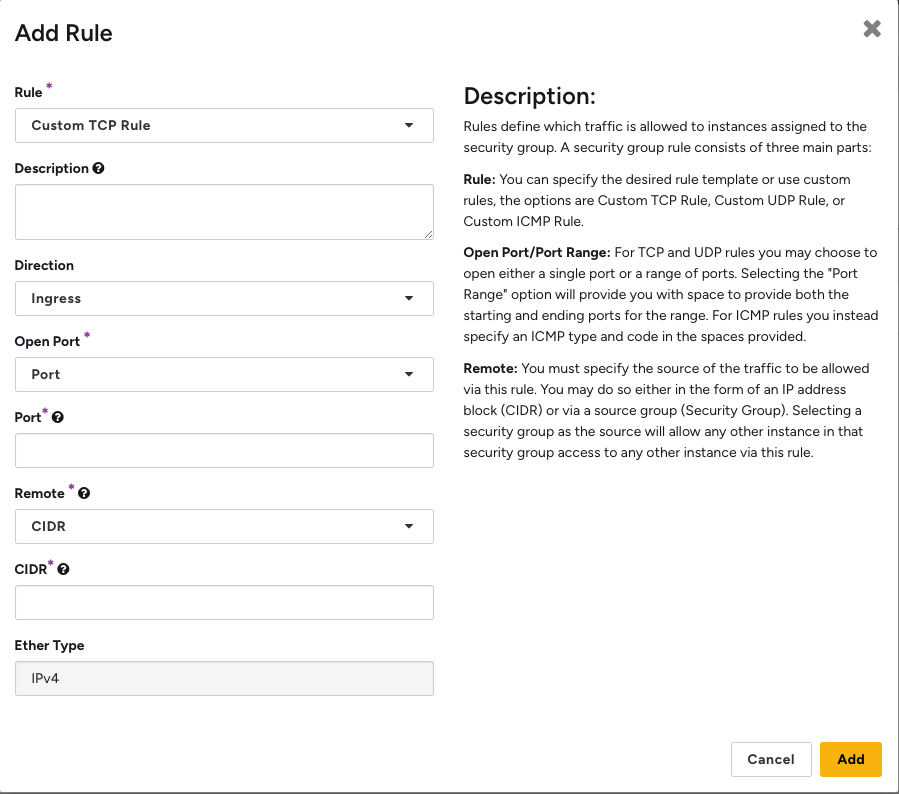
-
Enter the Port and CIDR values. To find your CIDR, search for
ipin Google or visit What Is My IP Address. Enter your IPv4 address in CIDR notation.Required ports for connection:
Port Usage 22 SSH Connection 443 Web UI 5901 TigerVNC Client 8000 Code-Server IDE 8443 NoVNC Browser Client -
After configuring the security group, navigate to your instance, click the dropdown arrow on the right of the row, and select
Edit Instance. On theSecurity Groupstab, select your security group from the left column and clickSave.
Connect to Testbed Instance in Nectar Research Cloud
You have several options to connect to your testbed instance:
-
Via SSH
If you created a key pair, use SSH to connect to your instance. Run the following command (replaceyour-keypair-namewith your actual key pair name and1.2.3.4with your instance’s IP address).ssh -i your-keypair-name.pem ec2-user@1.2.3.4Note
Ensure port
22is open in your security group.Information
On Linux/MacOS, if you encounter a permission error, run this command to set the correct permissions on your key file (replace
your-keypair-namewith your actual key pair name):chmod 400 your-keypair-name.pem -
Open the Dataspace Dashboard (works after dataspace initialisation has completed) Access the VM’s GUI through your web browser:
Navigate to
https://1.2.3.4/dashboard(Where 1.2.3.4 is the IP of your Nectar VM)Note
Ensure port
443is open in your Network Security Group. Your browser may show a security warning due to the self-signed certificate. You can safely proceed.Connection Failed?
Your dataspace takes time to install. If you cannot load the dashboard, try to SSH into your virtual machine, and check the welcome message. If you see
The dataspace is currently being configured., then your dataspace is being configured. -
Via TigerVNC Client
After setup completes, access the instance using TigerVNC Client by entering your instance’s IP address with port5901.For example, if your instance IP is
1.2.3.4, enter1.2.3.4:5901to connect.Note
Ensure port
5901is open in your security group. -
Via NoVNC Browser Client
Access the instance GUI through your web browser by navigating tohttps://1.2.3.4:8443, where1.2.3.4is your instance’s IP address.Note
Ensure port
8443is open in your security group. -
Via Code-Server
Access the code-server IDE directly in your browser without SSH by navigating tohttps://1.2.3.4:8000, where1.2.3.4is your instance’s IP address.Note
Ensure port
8000is open in your security group.
Verify Installation
To verify that the bootstrap script has completed successfully:
- Connect to your VM via SSH
- Check the cloud-init logs:
sudo tail -f /var/log/cloud-init-output.log - Look for the completion message indicating the installation finished
- Verify Docker containers are running:
sudo docker ps